If you’d like to get full access, you’ll need to join my Potting Table Block of the Month program. There are lots of great options, so make sure to check them out below!
Already a 2023 BOM Member? Log in here:

Join My BOM Club and Get…
✔️ 1 quilt block pattern per month
delivered to your email
✔️ Monthly tutorials
✔️ Access to my private Facebook group,
just for BOMers
Virtual Class available at additional cost

Come Quilt with Me!
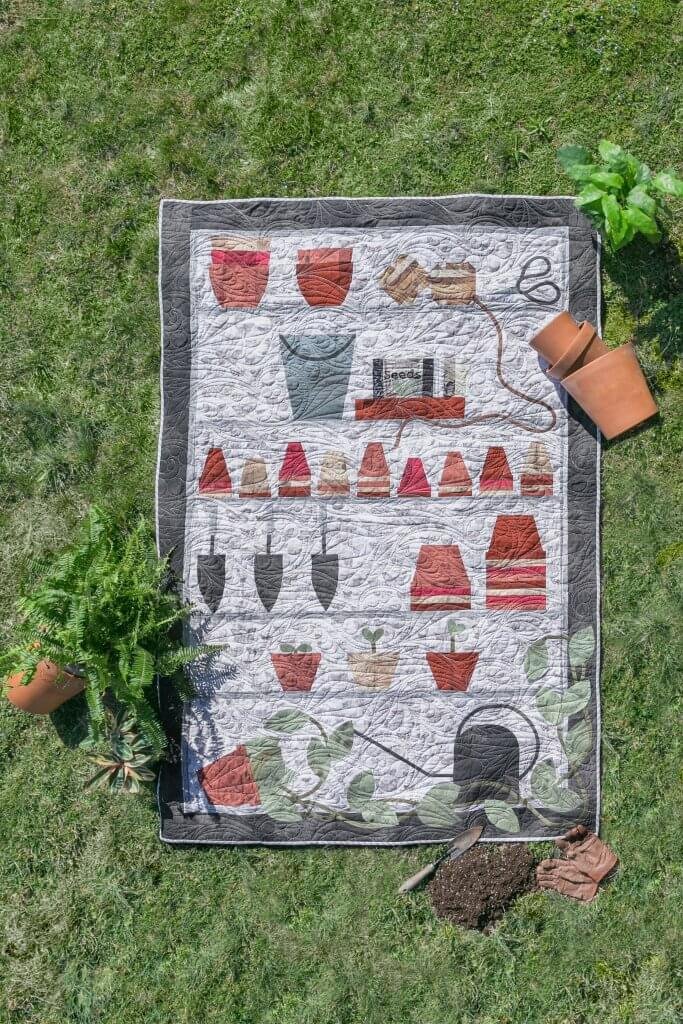
Come quilt with me as we create a garden–themed Block of the Month! Cultivated to introduce seedlings (beginners) to new skills and keep it interesting for the well-rooted quilters (quilting pros), we’ll be using a variety of techniques and having a blast while we complete this planty quilt.

Skills you’ll learn:
✔️ Traditional Piecing
✔️ Bias Tape Appliqué
✔️ Curved Piecing
✔️ Invisible Machine Stitch Appliqué (you can use your favorite method if you’d rather)
✔️ Foundation Paper Piecing (for more advanced quilters, I’m going to challenge you with directional prints!)
Choose Your Add-ons
Basic
Patterns + Fun
- 12 patterns – 1 for each block of this gorgeous quilt
- Monthly blogs and tutorials
- Access to our private FB group
- All patterns available now! Work at your own pace!
+ Classes
Extra support
- Step by step video instruction on the monthly pattern
- Exclusive content, just for class members
- Printable cheat sheets
- Lifetime access to all class content
+ Fabrics
Everything you need
- All the fabrics you need for the quilt top and binding
- Fabrics organized in labeled clear bags
- Optional add-ons like templates, backing, and supplies
FAQ
What is a Block of the Month?
A Block of the Month program is a 12–month program. Each month you will receive:
✔️ A digital copy of the newest quilt block pattern
✔️ An exclusive blog post
✔️ Helpful tips and tricks from me
✔️ Access to my exclusive Facebook group, just for BOMers
There are lots of great add-ons that will make this program an even more incredible experience for you, but they are totally optional. In addition to the standard BOM program, you can add on a virtual class component.
When does the program start?
My Potting Table Block of the Month (BOM) program is ongoing! You can join the program at any time this year and work at your own pace or catch up to the rest of us.
What size is the quilt?
The quilt that we will make together is a large twin size, measuring 60″ x 90″. Feel free to add or take away blocks to get it to a size that you prefer, though: if you’re looking for a throw size, just nix a single large row to get a quilt that measures 60″ x 75.”
What do I get when I join?
There are a few options when joining this BOM program, so feel free to go bare-bones or add on as you see fit and build the perfect program for you:
Basic BOM Program
✔️ 1 quilt block pattern per month
delivered to your email
✔️ Member-only tutorials
✔️ Access to my private Facebook group,
just for BOMers

Class Add-On
✔️ Step by step video instruction on the monthly pattern
✔️ Exclusive content, just for class members
✔️ Cheat Sheets
✔️ Lifetime access to all class content
I’m In! What’s Next?


I’m SO excited that you’ll be joining me for this program! Once you purchase, you’ll be able to log in, check out your welcome packet, and wait patiently for the BOM to begin.


[/restrict]